Thursday, July 20, 2006

2005.5 A5 Jetta TDI Fuel Filter Change

If your car looks like this 2005.5 Jetta TDI, then this fuel filter change info might apply to you. Changing the filter yourself is the one of the easiest things you'll ever do with some of the following tips. Click on photos for full size image.

This is the fuel filter part # that fit my car. It comes with a large green seal that goes around the fuel filter housing cover, a series of blue seals that are hooked to each other and a metal washer to replace the one underneath the blead screw.
This is what my fuel filter looked like from the top. Five torx screws hold the filter housing cover on and there is one torx bleed screw in the middle. Make sure your car is shut off and back the bleed screw off by a couple turns. There should be no pressure on the fuel system at this point. Remove all five screws from the fuel filter housing cover.
In the photo below you can see the large green seal on the filter housing cover. This must be changed with the replacement. I did see some grit on the tabs of the filter housing and gently removed it away from the opening of the filter housing. NOTE: I wrapped the filter housing to catch any diesel that might drip over the sides of the filter housing. If you're careful and pull the cover up very slowly you can easily contain any diesel drips. Beware, there is fuel that will drip out of the holes in the filter housing cover that are attached to the black fuel lines but you can shake it out into the fuel filter housing. See the holes below?

The filter element is attached to a black plastic assembly with two seals on the inside. During my experience the two seals on the inside held on tightly during the entire removal of the filter element. I had to carefully rotate the filter and pull up at the same time. If you pull too hard too fast you WILL sling diesel out of the housing and onto your engine. Pull it out slowly, you'll be fine. I cut a washed out milk jug in half and put it to the side of the filter housing to put the fuel filter into.

The next step is to put in the new fuel filter. Learn from my mistake and push the filter down slowly. I was a little over excited about changing the fuel filter myself and pushed down a little too quickly as I was putting in the new filter. There was fuel on the bottom of the filter housing and it squirted diesel up and out of the housing kind of like when you cup you hands in water and squeeze them together.

Once the filter is fully seated you need to replace the blue seal assembly shown below. It didn't stay on very securely and I was careful not to shift the seal during the replacement of the filter housing cover which actually has alignment pins underneath it so the seals will mate to the filter housing cover properly.

Now I have read that some people fill up the housing with diesel before they put the cover back on. I didn't have to because I didn't remove any diesel from the filter housing and I must admit I'm still not sure where water in this fuel filter gathers. I've read that it gathers in the filter assembly and is removed during the filter change, but I can't confirm that. Post an anwer if ou know. Okay,...let's get back to the filter change. Tighten each torx a few turns at a time as you alternate from one side of the cover to the other. This will help bring the cover and green seal straight down and not crooked. At this point the cover was tightened completely and I had the bleed screw backed off a few turns. REMOVE ALL paper towels/rags and tools. My wife watched the bleed screw as I turned the ignition one turn WITHOUT turning the engine over. She saw small diesel bubbles come out from the screw threads and I turned the ignition off. I repeated this one more time and she didn't see anymore bubbles. Air moves easily around the threads but the thicker diesel does not. I tightened the bleed screw down completely with the new bleed screw washer and then turned my car on. It ran perfectly after the change.

Friday, July 14, 2006

Setup XGL/Compiz on Ubuntu and have your videos play at normal speed

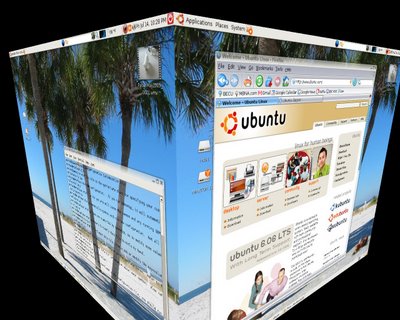
I recently followed the instructions for installing XGL/Compiz in Ubuntu. Check this out, XGL and Compiz now accomplishes what Windows Vista plans to accomplish in 2007. Want to see it in action? Click on this link and then view the movie for "Visual Workspace". This shows it on Suse, but it works equally well on Ubuntu with ATI or Nvidia video cards. If you don't have one of these video cards, you may want to check out this link for AIGLX. XGL and Compiz provides your desktop with incredible visual effects and a cube you can spin to select one of four desktops for you to work/play on. My machine is only a 1.5 ghz processor with 512mb of RAM and a 32mb Nvidia card and XGL/Compiz worked perfectly after install. The only thing that didn't work was the playback of video formats like Quicktime and .wmv files. They played back very slow and this frustrated me. Apparently XGL/Compiz is very new at this date and is not fully compatible with all video drivers. After about 200 Google searches I found this link to fix video playback and it worked perfectly.

To sum it up, follow these instructions for good video playback after XGL/Compiz install.
  1. Google or search the Ubuntu Forum or Ubuntu Guide and figure out how to install Mplayer or view more notes below to see how to install Mplayer and the Firefox plugins automagically.
  2. After you install Mplayer edit ~/.mplayer/config and append a line: vo=gl2,sdl,x11
  3. The~/.mplayer/ folder can be found by opening Nautilus in Gnome and selecting the option to View Hidden files.
  4. To have a video play in Mplayer by default, right click the video in Nautilus, choose properties and select Mplayer as the default video player.
I used KSnapshot for this screenshot by using a 10 second timer to get the cube in the position I wanted it for the screenshot.
This is the screen you'll see when you are in Nautilus, right click a video file, select properties and then click on the "OpenWith" tab as shown:
This is the screen you'll see when you right click Mplayer, select properties, choose the Video tab and then choose "X11" for the driver. This driver selection played all of my video files perfectly with XGL/Compiz running.I used Automatix to install Mplayer and lots of other useful software. Automatix also installed the Mplayer plug into Firefox so that Quicktime Trailers play perfectly in Firefox. One more tip, the first time you play an embedded Mplayer movie in Firefox, you might have to right click the movie, select properties and choose the X11 driver. Try it,...you'll like it.

If you want to disable XGL/Compiz and return to your original GDM then delete all of the text in file sudo gedit /etc/gdm/gdm.conf-custom, save the empty file and if you had "thefuture" setup to start automatically then disable it. Restart your PC and XGL/Compiz will not start. I found this removal method half way down the page at this link .

Sunday, July 09, 2006

2005.5 Jetta TDI with Oil Where I Don't Think It Should Be

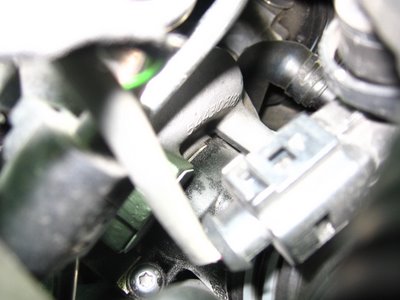
Here's an update to my original blog. The original blog is from the # symbols down. This photo is what the dealer told me is the PCV tube/valve. Directly in the center of the photo is where the PCV valve dumps directly into the outside filtered air line after the air filter and directly before the turbo inlet. They said the oil goes through the PCV valve and builds up in the air line before the turbo inlet and the seapage I'm seeing is within factory specifications. The receipt they gave me stated, "Found comercially acceptable seapage from turbo inlet...area cleared oil and reinstalled underbelly shield".
####################################
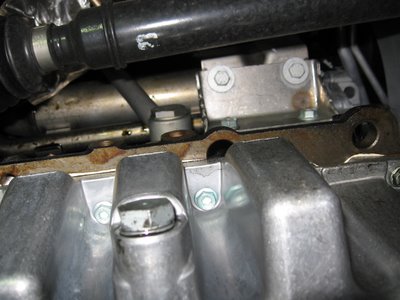
I have a 2005.5 Jetta TDI and just did the 20k oil change with the recommended 505.01. I changed my own oil and the view you see in the first photo is with me lying underneath the oil pan looking straight up. The pipe with oil on it looks about 3/4" dia. and the larger pipe above it, on the left of the pipe, had oil on it that looked like it might have dripped onto the 3/4" dia. pipe.

I don't know what these pipes are or where the oil is coming from. Does anyone know? My username at tdiclub.com is nofreerides. I have to mention that like many new TDI owners I noted that the oil on the diptstick was above MAX and that the dealer said that was normal and even showed me a brand new car on the lot whose oil dipstick was at the same location as mine above the MAX mark on the dipstick. The oil level reached the top of the ball on the dipstick. If you think this may have contributed to the oil on these pipes, please let me know where you think the oil may have come from and if there is a big issue that I need to look into.

Click on photos for FULL size photo.

Thanks,


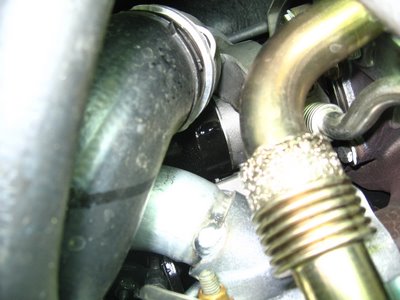
This is a closer view of the two pipes after I cleaned them up. See where the larger of the two pipes goes into a fitting? That is where I saw oil also.
This photo is from the top of the engine looking down. Click on it for full size image. In the very center of this photo you can see the black plastic where the duct from the airbox enters the turbo. There is some oil residue on the black plastic. Look at the next photo.
In this photo I'm under the car, under the oil pan, looking up and click on the photo to see the the oil drip that is forming on the black plastic duct just before it enters the turbo. No oil on the metal part that fits inside of the black plastic duct. Any idea where the oil is coming from? It's a very small leak. I don't have much oil dripping onto the cover underneath the oil pan.

Thursday, July 06, 2006

Ubuntu with VMWare Server Running XP Pro

Check this out! I followed the instructions at http://ubuntuforums.org/showthread.php?t=183209&highlight=flash and now my Ubuntu linux system is running Windows XP Pro inside of it. Why you ask? Because it's the only way I can use IPSec to tunnel into my work account and use Outlook to check my email and I like Windows Movie Maker. VMWare Server makes this possible and is free. Here's a screenshot of Ubuntu (Linux) running a Gnome desktop with XP Pro running inside of the VMWare Server Software. I used to have to shut down Linux and then boot into my Windows partition. Now I never have to shut down Linux and Windows is always available.